Import and Export in Citeck ECOS
- Ekaterina Nikitina (Unlicensed)
- Irina Pastuhova (Unlicensed)
Introduction
When the import and export are used
The ECM system is most often introduced into the existing infrastructure of the organization, and the existing data is already stored somewhere. Therefore, the issue is to import data from external sources and to export data to external receivers.
Import and export tasks can be one-time or regular. One-time import tasks are generally required at the beginning of the life cycle of the system to import the required data from other systems. One-time export tasks are usually required, when new systems appear that require data stored in the system, or at the end of the life cycle of the system, when migration is performed on a replacement system.
Regular import and export tasks are typically required for normal interaction of the system with its environment. For example, it is possible to regularly import a reference from the available database or to load files from a folder. An example of a regular export task is to export the database for reporting. Citeck ECOS system contains a synchronization service designed for regular implementation of the import and export.
Managing the synchronization service
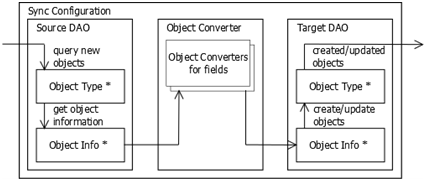
The synchronization service operates the synchronization configurations. Each configuration is a set of three components:
- Data Source (Source DAO)
- Data Converter (Converter)
- Data Receiver (Target DAO)
The synchronization with an arbitrary configuration takes place as follows:
- The Source DAO receives a recurrent set of objects to synchronize (all or only updated since the last synchronization);
- The Source DAO converts the received objects in the Object Info format;
- Object Converter provides the coordination of Object Info formats between the Source DAO and Target DAO; additional objects of the Object Converter can be used to convert the individual fields;
- The Target DAO creates or updates the objects in accordance with the information received.
Description of the synchronization capabilities
In Citeck ECOS, there are several implementations available for data sources and receivers:
- Alfresco Repository (source and receiver);
- JDBC-compatible Database (source and receiver);
- XML-files Folders (source);
- Arbitrary Files Folders (source);
- Reporting Database (receiver).
Some converters implementations are also available:
- constant value
- string replacement by a regular expression
- conversion of a map to a string by a template
- conversion of a map to a repository object
- conversion of a foreign key to a repository object
- conversion of a repository object to a map
- conversion of a map to another map
- conversion of a string to a map with a single key
- conversion of a string to date
- current date
- converters chain invocation
Examples of synchronization configurations
The simplest synchronization configuration
The synchronization configuration is performed in the Spring context-file (*-context.xml files). The reference import from an external database table in Alfresco is configured in the following example. Each object of the configuration (the source, the converter, the receiver and the configuration itself) is set in the Spring Context XML-notation.
We begin with the data source. First, the usual JDBC Data Source shall be configured; it specifies the parameters of the database connection:
<bean id="test-import-datasource"
      class="org.springframework.jdbc.datasource.DriverManagerDataSource">
    <property name="driverClassName" value="org.postgresql.Driver"/>
    <property name="url" value="jdbc:postgresql://localhost:5432/testdata"/>
    <property name="username" value="alfresco"/>
    <property name="password" value="password"/>
</bean>
Next, the actual JDBC data sources are configured:
bean id="test-import-source" parent="ExternalSync.DAO.JDBC">
    <property name="dataSource" ref="test-import-datasource" />
    <property name="queryConstructor">
        <bean parent="ExternalSync.QueryConstructor.SQL">
            <property name="allQuery">
                <value>SELECT id, name, text FROM data</value>
            </property>
            <property name="newQuery">
                <value>
                    SELECT id, name, text FROM data WHERE version > :version
                </value>
            </property>
            <property name="currentVersionQuery">
                <value>SELECT MAX(version) AS version</value>
            </property>
        </bean>
    </property>
</bean>
As can be seen from the configuration, the data source refers to the previously defined JDBC DataSource and sets a few queries:
- allQuery – acquires all records from the data source;
- newQuery – acquires new records (with the version greater than the specified);
- currentVersionQuery – acquires the current version of the data.
newQuery and currentVersionQuery are needed for the differential synchronization. It works as follows: after each synchronization, the system stores the current version of the records (currentVersionQuery) and acquires records that have changed since this version (newQuery) during the next differential synchronization.
We configure the data receiver:
<bean id="test-import-target" parent="ExternalSync.DAO.Node">
    <property name="nodeType"
        value="{http://www.citeck.ru/model/test/1.0}testRecord" />
    <property name="newNodesRootPath"
        value="/app:company_home/st:sites/cm:test/cm:documentLibrary" />
    <property name="keys">
        <set><value>extsync:id</value></set>
    </property>
</bean>
As can be seen from the configuration, the repository data type that corresponds to the records in the external table, as well as the path name, where new objects will be created, and a set of key properties are defined in the data source. Altogether, that works as follows: when the data to be stored in the repository are coming from an external source, we still do not know if they exist in the repository or not. The Lucene query is made for this purpose of the form:
TYPE:"{http://www.citeck.ru/model/test/1.0}testRecord" AND @extsync\:id:"45"
In other words, objects are searched by a key: if something is found it shall be updated; if not then a new object shall be created. New objects are created on the path newNodesRootPath and with child association newNodesAssocType (default cm:contains).
In this example, the data source returns maps of the following form:
{
    "id": 1,
    "name": "Sergey",
    "text": "Hi, I am Sergey"
}
and they shall be converted to a form suitable for search and creation (updating) of a repository object:
{
    "extsync:id": 1,
    "test:author": "Sergey",
    "test:theme": "Hi, I am Sergey"
}
The converter solves this problem. As can be seen here, the names of the keys of the map shall be simply replaced by the names of the repository properties in this case. For this purpose, it is enough to determine the following converter:
<bean id="test-import-converter"
      parent="ExternalSync.Converter.ImportRecord">
    <property name="propertyMapping">
        <map>
            <entry key="extsync:id"
                   value="id" />
            <entry key="{http://www.citeck.ru/model/test/1.0}author"
                   value="name" />
            <entry key="{http://www.citeck.ru/model/test/1.0}theme"
                   value="text" />
        </map>
    </property>
</bean>
The propertyapping property of the converter defines the mapping of repository properties to the names of the keys of the input map. The repository property serves as a key in this mapping, and the key of the input map serves as the value. In such a way, several properties of the repository can be tied up with the same key of the input map.
If the converting of values is required in addition to the key converting, then the converter property propertyConverters is used, which specifies how to convert the value for each of the properties of the repository. For example, the following configuration removes spaces at the beginning and the end of the value:
...
  <property name="propertyConverters">
    <map><entry key="test:theme" value-ref="test-spaces-conv" /></map>
  </property>
...
<bean id="test-spaces-conv" parent="ExternalSync.Converter.RegexpReplace">
    <property name="regexp" value="^ +| +$" />
    <property name="replace" value="" />
</bean>
When the source, receiver, and converter are specified, one can determine the configuration as follows:
<bean id="test-import-config" parent="ExternalSync.Config">
    <property name="name" value="test-import" />
    <property name="sourceDAO" ref="test-import-source" />
    <property name="targetDAO" ref="test-import-target" />
    <property name="converter" ref="test-import-converter" />
</bean>
In addition to the source, receiver, and converter, its name is shown in the configuration. At synchronization starting, that name and the synchronization mode (full or differential) are pointed out.
Options to start the synchronization
There are the following options to start the synchronization:
- Start on demand
- Start on schedule
In any case, the latest synchronization configuration must be written to the *-context.xml file and the server must be restarted before the synchronization starts.
To start on demand, it is necessary to send the following HTTP query to the server:
http://localhost:8080/alfresco/service/citeck/ext-sync/test-import?mode=full
Where http is the protocol, localhost is the Alfresco hostname, 8080 is the Alfresco port, alfresco is the name of the Web application of the Alfresco repository, service is the name of the Web scripts servlet, citeck/ext-sync/{sync-name} is the address of the Web script to start the synchronization, test-import is the name of the synchronization configuration, full is the synchronization mode (full). In this query, it is possible to change the name of the configuration and mode (full or diff).
When the synchronization starts the synchronization progress is captured in the log file as follows:
test-import: starting full synchronization
test-import: current version: {version=1}
test-import: received 4 objects to update
test-import: synchronization finished with success, created: 0, updated: 4, deleted: 0 objects
To start the synchronization on schedule one shall add a special bean in Spring context. The following example specifies that the configuration test-import will be sent to the full synchronization every hour (“cron” expression: 0 0 * * * ? is a template “seconds minutes hours days_of_month months days_of_week”).
<bean id="test-import-job" class="org.alfresco.util.CronTriggerBean">
    <property name="jobDetail">
        <bean class="org.springframework.scheduling.quartz.JobDetailBean">
            <property name="jobClass">
                <value>ru.citeck.alfresco.acm.sync.ExternalSyncJob</value>
            </property>
            <property name="jobDataAsMap">
                <map>
                    <entry key="ExternalSyncService"
                           value-ref="ExternalSyncService" />
                    <entry key="SyncConfigName" value="test-import" />
                    <entry key="FullSync" value="true" />
                </map>
            </property>
        </bean>
    </property>
    <property name="enabled" value="true" />
    <property name="scheduler" ref="schedulerFactory" />
    <property name="cronExpression" value="0 0 * * * ?" />
</bean>
Synchronization of linked reference tables
In the previous section, the property “test:author” was filled with a string from the “name” attribute of the external table. What if the “test: author” is not a property but association, and the string is some foreign key, for example, the user name. In such a case, the system shall find (or create) the linked object by a foreign key in the repository and create an association to the main object instead of setting the system property during the synchronization.
This can be done using the converter ExternalSync.Converter.Assoc. This converter allows to convert an arbitrary value to the repository object. As a preliminary, we need to define a separate receiver (Target DAO) for linked objects:
<bean id="test-import-people" parent="ExternalSync.DAO.Node">
    <property name="nodeType"
        value="cm:person" />
    <property name="keys">
        <set><value>cm:userName</value></set>
    </property>
</bean>
This Target DAO is connected to the user type (cm:person), and the user name (cm:userName) serves as a key. It is enough to configure the converter:
<bean id="test-import-people-converter"
      parent="ExternalSync.Converter.Assoc">
    <property name="targetDAO" ref="test-import-people" />
    <property name="converter">
        <bean parent="ExternalSync.Converter.ImportRecord">
            <property name="propertyMapping">
                <map><entry key="cm:userName" value="username" /></map>
            </property>
        </bean>
    </property>
</bean>
The ExternalSync.Converter.Assoc converter configuration is similar to the synchronization configuration: it identifies the receiver (targetDAO) and converter (converter). The source is not required because the data during the conversion is already retrieved from the source (in this case, one shall convert the foreign key to the repository object). The converter works as follows:
- the obtained data are sent to the embedded converter, which purpose is to provide data to the desired data receiver;
- when the data is converted, the receiver is inquired if there are suitable objects already. There are three options:
- if there is one suitable object then it is returned;
- if there are no matching objects then nothing happens by default (the converter returns an empty array or “null”);
- if there are several suitable objects then the first one is returned by default.
Behavior for the second and third option can be overridden by using the properties (respectively) zeroStrategy and manyStrategy, specifying them with one of the following strategies:
- PROCESS_ALL – complete all the received results;
- PROCESS_FIRST – complete the first received result;
- CREATE_NEW – create a new object;
- MERGE – merge all the results into one (not yet implemented);
- FAIL – issue an error message.
The configured converter test-import-people-converter waits for the map with “username” key at the input. It can be used as a part of the converter test-import-converter previously defined in order to organize an association:
...
<property name="associationMapping">
    <map>
        <entry key="{http://www.citeck.ru/model/test/1.0}author"
               value="name" />
    </map>
</property>
<property name="associationConverters">
    <map>
        <entry key="{http://www.citeck.ru/model/test/1.0}author">
            <bean parent="ExternalSync.Converter.Sequence">
                <property name="converters">
                    <list>
                        <bean parent="ExternalSync.Converter.MakeMap">
                            <property name="key" value="username" />
                        </bean>
                        <ref bean="test-import-people-converter" />
                    </list>
                </property>
            </bean>
        </entry>
    </map>
</property>
Importing files from a folder
To import files from a folder, the source “ExternalSync.DAO.File” is used. For this source, one can specify the folder, from which files will be imported, as well as (optionally) the folder, into which the successfully imported files will be moved, and the folder, into which the files that cannot be imported will be moved.
<bean id="test-import-file-source" parent="ExternalSync.DAO.File">
    <property name="sourceDir" value="/mnt/import-files/source"/>
    <property name="errorDir" value="/mnt/import-files/errors"/>
    <property name="successDir" value="/mnt/import-files/archive"/>
</bean>
Each object in this data source is a map with two keys:
- contentFile – file content
- contentFileName – file name
In the simplest case, one can use propertyMapping, which maps these keys to the corresponding Alfresco properties:
<property name="propertyMapping">
    <map>
        <entry key="cm:name" value="contentFileName" />
        <entry key="cm:content" value="contentFile"/>
    </map>
</property>
Further, one can continue to use this source on the analogy of the examples above.
In a more complex case, it is possible to select the individual components of the file name (using “RegexpReplace” converter) and then put them in properties or associations (using “Assoc” converter).
The source of files provides several options for the differential synchronization.
- Use single folder. The source stores the time when the file was modified as the version (file attribute in the file system), and the files that have changed later than last time are requested during the differential synchronization. This option is suitable if the number of files is small.
- Use the folders successDir and errorDir. After the file is imported successfully it is moved to the folder successDir (if specified). If the import fails, the file is moved to the folder errorDir (if specified), along with the error description file (.error file). After fixing the errors in the file, it can be returned to the folder sourceDir and the import will be repeated. In this scenario, one shall use a full synchronization, i.e. read all files from the folder.
Importing XML files
To import XML files into ECOS, a special data source is implemented. By analogy with the source of files (see previous section), one can specify the properties “successDir”, “errorDir”, and “sourceDir”, as well as a set of properties that defines the structure of the XML file:
- objectPath is an XPath expression that specifies the location of the XML elements for import (relative to the root XML element);
- attributesMap is a map that transforms the key of the output map into an XPath expression, from which one can retrieve the value for this key (relative to the imported XML element);
- defaultNamespace is a default XML namespace, which is used for the file, if it is not specified otherwise;
- xpathNamespaces is a map with additional XML namespaces, which transforms a prefix into a namespace.
We assume that input XML files have the following format:
<?xml version="1.0" encoding="UTF-8"?>
<documents>
    <document id="1">
        <author>Sergey</author>
        <text>Hi, I am Sergey</text>
    </document>
    <document ...>
        ...
    </document>
    ...
</documents>
Then the XML data source configuration can be written as follows:
<bean id="test-import-xml-source" parent="ExternalSync.DAO.XML">
    <property name="sourceDir" value="/mnt/import-xml/source"/>
    <property name="errorDir" value="/mnt/import-xml/errors"/>
    <property name="successDir" value="/mnt/import-xml/archive"/>
    <property name="objectPath" value="/def:documents/def:document"/>
    <property name="attributesMap">
        <map>
            <entry key="id"   value="./@id"/>
            <entry key="name" value="./def:name/text()"/>
            <entry key="text" value="./def:text/text()"/>
        </map>
    </property>
    <property name="defaultNamespace"
              value="http://www.citeck.ru/schema/test/1.0" />
    <property name="xpathNamespaces">
        <map>
            <entry key="def" value="http://www.citeck.ru/schema/test/1.0" />
        </map>
    </property>
</bean>
The data source configured that way returns maps with “id”, “name”, and “text” keys, i.e. the same as JDBC source in the first example, so it is possible to determine the import configuration, which uses the same converter and receiver, as in the first example:
<bean id="test-import-xml-config" parent="ExternalSync.Config">
    <property name="name" value="test-import-xml" />
    <property name="sourceDAO" ref="test-import-xml-source" />
    <property name="targetDAO" ref="test-import-target" />
    <property name="converter" ref="test-import-converter" />
</bean>
Directory of synchronization components
Available synchronization components (sources, receivers, converters) are documented in the form of abstract or specific beans in the sync-services-context.xml file. Each of them contains some values by default, and also lists which properties should be specified for sure, and which can be ignored.
If the bean is declared abstract (abstract="true"), one shall create a child bean to use it:
<bean id="..." parent="abstract-bean-id">
    <property name="..." value="..." />
    ...
</bean>
If the bean is not declared abstract then it is specific and to use it, one can create child bean (see above) or use it directly, for example:
<property name="..." ref="concrete-bean-id" />
<property name="...">
    <ref bean="concrete-bean-id" />
</property>
<property name="...">
    <map>
        <entry key="..." value-ref="concrete-bean-id" />
    </map>
</property>
Exporting data for reporting
In the ECOS system, the pre-defined configurations are done to export data to an external reporting database:
- reporting-export-nodes exports the objects of cm:cmobject type (and all subtypes, including cm:content, cm:folder, and dl:dataListItem, and child types) in a nodes table;
- reporting-export-people exports the objects of “cm: person” type (users) in a people table.
Using the DB access settings by default, the export occurs into the “alfrescoreporting” database on the same DBMS, with the same login and password as the primary database. To enable scheduled export, it is enough to specify in the configuration file alfresco-global properties:
reporting.sync-nodes.enabled=true
reporting.sync-people.enabled=true
The differential synchronization is done half-hourly by default; the schedule can also be changed in the file alfresco-global.properties:
reporting.sync-nodes.cronExpression=0 0/30 * * * ?
reporting.sync-people.cronExpression=0 15/30 * * * ?
All settings from the file alfresco-global.properties are applied only after Alfresco restarting.
The reporting database, as well as the “nodes” and “people” tables shall be created already and the full rights to the alfresco user (under which uploading performed) shall be granted for these DBs. For example, that can be done using the following commands for PostgreSQL:
CREATE DATABASE alfrescoreporting;
GRANT ALL ON DATABASE alfrescoreporting TO alfresco;
\c testdata
CREATE TABLE nodes (sys_node_uuid CHAR(36) PRIMARY KEY);
CREATE TABLE people (sys_node_uuid CHAR(36) PRIMARY KEY);
The format of the reporting tables is the following: a separate column in the table is made for each property, the column is called a property short name (all invalid characters are replaced with character _, for example, sys:node-uuid is displayed in the column sys_node_uuid). When new properties are occurred they are added as additional columns in the table. The mirroring properties are presented for associations in the system, such as the association letters:addressee will appear in column letters_addressee_added. Finally, the table has several special columns:
- noderef contains nodeRef of an object;
- parent contains nodeRef of a parent object;
- type contains a short name of the type.
Tools for one-time import and export
Importing the organizational structure from an XML file
A Web script for a simple one-time organizational structure import from an XML file is implemented in the system. The input XML file shall be in the following format:
<orgstruct>
    <record>
        <company>Рога и копыта</company>
        <branch>Филиал в г. Тула</branch>
        <department>Бухгалтерия</department>
        <employee>Бухгалтер</employee>
        <userid>kuznetsova</userid>
    </record>
    ...
</orgstruct>
The tag names can be arbitrary and are configured in the configuration file tomcat/shared/classes/alfresco/extension/templates/webscripts/ru/citeck/
import/orgstruct-import.get.config.xml (if necessary, this file shall be created):
<config>
    <recordName>record</recordName>
    <groupTypes>
        <groupType id="company"              xmlField="company"
                   shortName="{type}{index}" displayName="{name}"
                   groupType="branch"        groupSubtype="company"
                   scope="global" />
        <groupType ... />
        ...
    </groupTypes>
    <userTypes>
        <userType id="user" xmlField="userid" alfField="cm:userName"
                  scope="employee,manager" />
    </userTypes>
</config>
An example of a complete configuration of the organizational structure import can be viewed in the file
tomcat/webapps/alfresco/WEB-INF/classes/alfresco/templates/webscripts/ru/citeck/import/orgstruct-import.get.config.xml.
In this configuration, the section groupTypes contains the configuration of the groups imported and the section userTypes contains the configuration of the users connected. Each element groupType shall contain the following attributes:
- id is the ID of the group type within a configuration file;
- xmlField is the name of the XML element for the groups of this type;
- shortName is the template of a group short name, in which one can use the pattern-matching strings {type}, {index}, {parent} (see below);
- displayName is the template of a group name, in which one can also use the pattern-matching strings (see below);
- groupType is the type of an organizational structure group (branch or role);
- groupSubType is the subtype of an organizational structure group (a branch type – department, chapter, etc. or a role type – head, average executive);
- scope defines in what types of groups that group can be located (comma separated) or global – if in the root of the organizational structure.
Templates for group names are set in the attributes shortName and displayName. In this case, shortName is the group ID and displayName is the name of the group in free language. Pattern-matching strings can be used:
- {type} is replaced with the ID of a group type (specified by the attribute id);
- {index} is replaced with the unique group number within its type;
- {parent} is replaced with the name of the parent group (depending on the context by shortName or displayName);
- {name} is replaced with the name of a group from the input XML file, such as "Accounting".
The UserType element is single usually and contains attributes similar to attributes groupType:
- id is the ID of the user type within a configuration file;
- xmlField is the name of the XML element for the users of this type;
- alfField is the name of the property, on which the user is searched for in the repository;
- scope defines in what types of groups that user can be located (comma separated), these are usually all groups with groupType=role.
When importing the organizational structure from an XML file, the groups are mapped by a name (displayName) and users are mapped by a field specified in the attribute alfField. If the relevant group is not found, it is created. The creation of users is not carried out (usually users are created separately through the import of users from LDAP or from a CSV file).
To import the organizational structure from an XML file, that file shall be loaded into Alfresco and the following script shall be used:
http://localhost:8080/alfresco/service/citeck/orgstruct-import?nodeRef=...&from=0&to=100
The ID of the loaded XMl file is specified in the attribute “nodeRef”; the number of the first entry to load (inclusive) is specified in the attribute “from”, the number of the last entry to load (not inclusive) is specified in the attribute “to”. The actual loading consists of sequential activation of Web scripts with different indexes:
...&from=0&to=100
...&from=100&to=200
...&from=200&to=300
...&from=300&to=400
...
The import shall be stopped when the Web script returns an empty data structure, i.e. there are no entries with the specified indexes.
That import tool is one-time (i.e. it cannot be used for synchronization of the organizational structure on a regular basis). The first reason for this is that the group name, which can often vary, is used as a group ID. As a result, several different groups will be made for the same branch (role) that will lead to the incorrect organizational structure imported. Relocations of users and groups are also not tracked in this approach: if the user (group) has been moved to a different group, the user (group) will be in the old and new groups simultaneously as a result of the re-import.
Importing the organizational structure from Excel
The organizational structure also can be imported from an Excel file one-time. For this purpose, it is converted to an XML file and then the procedure described in the previous section is executed. The Excel file preview, similar to the previous XML file, is as follows:

The following procedure describes how to convert an Excel file to an XML file using Microsoft Excel.
First, it is necessary to describe the schema of the XML file in XSD format:
<?xml version="1.0" encoding="UTF-8"?>
<xs:schema xmlns:xs="http://www.w3.org/2001/XMLSchema"
   targetNamespace="http://www.citeck.ru/orgstruct/test/1.0"
   xmlns:dd="http://www.citeck.ru/orgstruct/test/1.0"
   elementFormDefault="qualified" version="0.1">

    <xs:complexType name="record">
        <xs:sequence>
            <xs:element name="company"     type="xs:string" minOccurs="0" />
            <xs:element name="branch"      type="xs:string" minOccurs="0" />
            <xs:element name="department"  type="xs:string" minOccurs="0" />
            <xs:element name="subdivision" type="xs:string" minOccurs="0" />
            <xs:element name="employee"    type="xs:string" minOccurs="0" />
            <xs:element name="userid"      type="xs:string" minOccurs="0" />
        </xs:sequence>
    </xs:complexType>

    <xs:element name="orgstruct">
        <xs:complexType>
            <xs:sequence>
                <xs:element name="record" type="dd:record"
                            maxOccurs="unbounded" />
            </xs:sequence>
        </xs:complexType>
    </xs:element>

</xs:schema>
It is important that the number and sequence of the columns in the Excel file and the XSD schema are the same.
After that, the XSD schema should be added to Excel on the Developer tab of the Ribbon (to enable this tab, go to Menu – File – Options– Customize Ribbon and select the Developer tab). There is a “Source” button on the Developer tab:

Go to the Source – XML maps and add the XSD schema, saved above.
After that, the task pane will look like this:
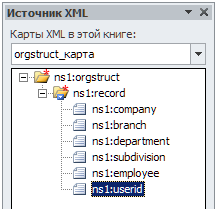
Next, click ns1:record and choose “Associated item”. After that, the table will be painted:

Next, save the file in XML format (XML document). It will be saved in the following form:
<?xml version="1.0" encoding="UTF-8" standalone="yes"?>
<ns1:orgstruct xmlns:ns1="http://www.citeck.ru/orgstruct/test/1.0">
    <ns1:record>
        <ns1:company>Рога и копыта</ns1:company>
        <ns1:branch>Головной офис</ns1:branch>
        <ns1:department>Управление</ns1:department>
        <ns1:subdivision>Канцелярия</ns1:subdivision>
        <ns1:employee>Делопроизводитель</ns1:employee>
        <ns1:userid>minintseva</ns1:userid>
    </ns1:record>
    ...
Next, it is necessary to remove the substrings ns1: in it and the XML file to import the organizational structure will be ready: it can be used to import the organizational structure, as described in the previous section.