Development (build from source)
1. Install and configure the necessary software
Install Oracle Java (JDK) version 8 http://www.oracle.com/technetwork/java/javase/downloads/index.html
Apache Maven 3.2.5+ http://maven.apache.org/download.cgi
Mercurial https://www.mercurial-scm.org/
Set the environment variables. Set M2_HOME = <MAVEN_PATH> /apache-maven-3.3.1
2. Set up maven to work with Citeck artifacts
For maven, you need to make additional settings to connect to citeck artifactory in the settings.xml file (copy the file to your .m2 directory)
3. Cloning of the ECOS Community repository
1. The mercurial command for cloning the repository:
> hg clone https://bitbucket.org/citeck/ecos-community
2. The command to go to the master branch
> hg update master
4. Launch project from CLI
$ run.sh
> run.bat
User: admin / admin
Configure IntelliJ IDEA (optional)
Opening a project from Idea - as maven project (pom.xml in root directory)
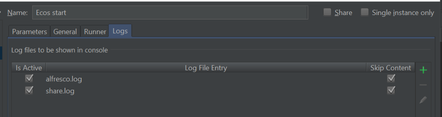
Configuration for launching from IntelliJ IDEA
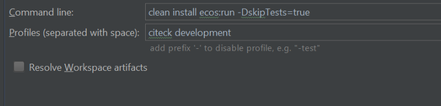
- Edit configurations → Create → maven
- Parameters → Command line: clean install ecos: run -DskipTests = true
- Profiles → citeck development
- Runner → Environment variables: MAVEN_OPTS = -Xms256m -Xmx2G
You can run this configuration both on Run and Debug with running breakpoints in Java
Useful links
http://docs.alfresco.com/5.1/concepts/alfresco-sdk-installing-prerequisite-software.html - Setting Up the Environment
Test / Production
The document describes how to install and configure Citeck ECOS system.
Installing Alfresco
For computers with standard architecture, there are installers for Windows, Linux, and Mac OS. The installation in this manual is on the amd64 computer with Windows OS. Installation under Linux and Mac OS is similar.
This setup wizard installs Alfresco Community Edition and additional software, including JDK, Tomcat, SOLR, and LibreOffice. It also includes interfaces and extensions such as Share Point integration and Google Docs.
Getting files
The installer could be downloaded here

alfresco-community-5.1.f.zip is used for manual installation under non-standard architecture.
Installation using the wizard
Installation, using the wizard, is performed step-by-step. At each step, specific settings are selected.

The wizard allows choosing between two types of installation: Easy and Advanced. For more settings, choose Advanced.

Chose folder to install on your drive. Make sure that you have 2 Gb free space.

Enter the port of your database. Make sure that the TCP/IP port you selected is open and not busy.

Enter the port of your LibreOffice Server.

Choose FTP port for integrated alfresco server

Alfresco Installer includes the necessary components for the system functionality. The only component required for installation is Alfresco. All other components or their equivalents could be used externally.

The following dialogue and several subsequent dialogues are designed to configure ports. The port settings could be set as default, if they are not used.
- Tomcat Server Port is the primary HTTP port;
- Tomcat Disabling Port is to disable Tomcat (close in FW);
- Tomcat SSL Port is the main HTTPS application port;
- Tomcat AJP Port is to communicate with other servers (close in FW);
- FTP is for FTP access;
- RMI is for calling remote procedures (close in FW);
- SharePoint is for on-line editing (open in FW);
- LibreOffice is for the previewing generation.
Other important options in the Alfresco installation process:
- Installation Directory is the root directory , in which the system will be installed;
- Administrator Password option sets the Alfresco administrator password. If PostgreSQL (chosen as the component) is installed, then a postgres user will have the same password;
- Start Services (manually or automatically). After installation, the following services will be created: in Windows – alfrescoTomcat and alfrescoPostgreSQL, in Linux – alfresco.
After installation, the folders of installed components appear in the Alfresco root folder (tomcat, postgresql, etc.). Alfresco itself will be installed in tomcat in the form of two Web applications:
- alfresco.war (Repository) is the server responsible for data storing/processing. Interaction with it occurs mainly through REST API;
share.war (Share) is the client, which provides a graphical interface for end-user to interact through a Web browser.
After installation, it is necessary to run Alfresco and make sure that the system works. To do this, run the relevant services if they are not already run, and log in “share”: http://${hostname}:${port}/share.
For example, http://127.0.0.1:8080/share. The username is “admin” and the password is the one, that was specified in the Administrator Password field. The test is passed if the login was successful. If it was not, see the section “Operation check” to find the cause.
Installing Citeck ECOS overview
Alfresco is a platform for developing end-user solutions. Citeck ECOS is that solution.
There are 2 ways to install Citeck ECOS on top of existing Alfresco installation:
- WAR files
- AMP files
Installing Citeck ECOS - WAR files
Web application archive (WAR) - are used to deploy web application
Steps to install:
- Install Alfresco using instruction above
- Download actual WAR files from Citeck web site
- Stop Alfresco
- Rename files in Alfresco tomcat webapps folder (usually alfresco/tomcat/webapps):
alfresco.war - > alfresco.war.old
share.war - > share.war.old - Copy downloaded WAR files to Alfresco tomcat webapps folder
- Delete catalogs "alfresco" and "share" in Alfresco tomcat webapps folder
- Start Alfresco
Installing Citeck ECOS - AMP files (deprecated)
Citeck ECOS consists of several special modules of Alfresco Module Package (AMP). Modules are files with the “amp” extension. They are installed on top of Alfresco, using special tool alfresco-mmt.jar.
Working with amp files
alfresco-mmt.jar is located in $ALFRESCO_HOME/bin.
Some options to use this tool are provided below:
- Installation of a single AMP module
java -jar alfresco-mmt.jar install path/to/ecos-repo.amp path/to/alfresco.war
- Installing AMP modules from a folder
java -jar alfresco-mmt.jar install path/to/amps-directory path/to/alfresco.war
- Listing of the installed modules
java -jar alfresco-mmt.jar list path/to/alfresco.war
The tool also:
- tracks modules dependencies,
- tracks rewritable files,
- creates WAR backups (*.war.bak).
In the folder $ALFRESCO_HOME/bin, there is the script apply_amps.sh or apply_amps.bat, depending on the operating system. With its help, it is possible to install AMP files in the package mode. The script installs all modules, which are located in specific folders, and cleans temporary files. The following folders are for modules:
- “$ALFRESCO_HOME/amps” – modules for Repository (alfresco.war);
- “$ALFRESCO_HOME/amps_share” – modules for Share (share.war).
When installing ECOS, the “apply_amps” script is better be used with the parameter “-force” to rewrite modules installed.
Using the “apply_amps” to install the modules is quite convenient.
Some work, however, must be performed manually:
- downloading new modules from the repository,
- backup,
- stop/start of Alfresco.
In order to automate installing and updating Citeck ECOS, the scripts delivery.sh and delivery.bat were created, for Linux and Windows correspondingly. The scripts are doing the same thing, so considering each separately makes no sense. Examine the option for Linux.
For easy installation or update, two files will be needed: delivery.sh and properties.sh. They must be in the same folder. The executable file is delivery.sh.
delivery.sh contains an algorithm for system updates and is the same for any type of installation.
properties.sh contains options that can be configured from installation to installation. Consider some options for properties.sh.
- ARTIFACTORY_USER, ARTIFACTORY_PASS, ARTIFACTORY_SERVER, WGET, CURL, DOWNLOAD – these options are used to get the modules from a remote server.
- PROXY_SERVER, PROXY_USER, PROXY_PASS, PROXY_OPTS, CURL_PROXY – in addition to the previous options, when getting the modules through a proxy server.
- AMPS, AMPS_SHARE – module relative addresses in the remote server, for Repository and Share respectively.
- UPDATE_REPO, UPDATE_SHARE – indicators, specifying whether the update is applied.
- JAVA – string to run JVM.
- ENABLE_BACKUP – indicator to enable/disable the backup.
- ALFRESCO_DIR, ARTIFACT_DIR, BACKUP_DIR, CATALINA_HOME – path to the directory.
delivery.sh operation algorithm:
- Upload all required modules to the installation folders.
- Stop Alfresco.
- Do backup if necessary.
- Install the modules, using “alfresco-mmt.jar” tool.
- Delete temporary files.
- Run Alfresco.
Underlying potential problems when working with AMP files
- When installing modules, Alfresco shall be turned off. If this condition is not met, then the Web applications fail. In this case, it is necessary to delete “alfresco.war” and “share.war”, take their 'untouched' versions and re-install all the modules. Delivery.sh disables Alfresco.
- The module downgrade is prohibited. There is a module properties file inside an amp file (an amp file is a zip archive). It contains the version of the module. It is not possible to install the module in Alfresco, if the newer version module has been already installed. The versions of the modules installed are stored in the database.
Installing Citeck ECOS - Docker container
Docker-image of ECOS Community is based on CentOS 7.
All required software is already installed.
Run the image with:
It is recommended to use environment variables to configure the container:
To store data during startup it is better to mount volumes for data. You can do it with:
It will create /opt/alfresco/ directory with content, solr4, postgresql sub-directories mounted to docker-container by docker-engine.
To create a separate volume for logs is also a good idea. The command is:
There is also a function allowing you to mount additional properties file and it will be included in alfresco-global.properties
Few tags are available for ECOS Community:
- latest - redeployed every day and usually used for QA purposes
- stable - release version
List of variables and default values:
Operation check
In the event of faults in operation of the system, it is worth looking for a cause in the log files.
- Alfresco log files – alfresco.log, share.log;
- Tomcat log file – tomcat/logs/catalina.out;
- In “catalina.out” after successful start:
INFO: Server startup in 472138 ms - In alfresco.log after successful start:
INFO [...DeclarativeRegistry] Registered 501 Web Scripts (+0 failed), 783 URLs - In share.log after successful start
INFO [...DeclarativeRegistry] Registered 462 Web Scripts (+0 failed), 480 URLs - In share.log after successful login
INFO [...EditionInterceptor] Successfully retrieved license information from Alfresco.
- In share.log after login with an error:
INFO [...EditionInterceptor] Unable to retrieve License information from Alfresco: 404
(see the text of the error in alfresco.log)
- In share.log after login with an error:
INFO [...EditionInterceptor] Successfully retrieved license information from Alfresco.
(the user has entered the password incorrectly)
Alfresco and ECOS settings
When installing, the settings shall be corrected in unusual cases only: individual installation of DBMS, LibreOffice, imagemagick, swftools, etc.
Settings file: tomcat/shared/classes/alfresco-global.properties
Settings of the access to the DBMS
db.driver=org.postgresql.Driver
db.username=alfresco
db.password=admin
db.url=jdbc:postgresql://localhost/alfresco
External program settings
LibreOffice
ooo.exe=/opt/alfresco-5.1.f/libreoffice/program/soffice.bin
ooo.enabled=true
ooo.port=8100
Image Magic
img.root=/opt/alfresco-5.1.f/common
img.dyn=${img.root}/lib
img.exe=${img.root}/bin/convert
SWF Tools
swf.exe=/opt/alfresco-5.1.f/common/bin/pdf2swf
swf.languagedir=/opt/alfresco-5.1.f/common/japanese
Other settings
Path to the file repository
dir.root=./alf_data
dir.contentstore=${dir.root}/contentstore
dir.contentstore.deleted=${dir.root}/contentstore.deleted
External protocols and interfaces
system.webdav.servlet.enabled=true
imap.server.enabled=false
imap.server.port=143
ftp.enabled=true
ftp.port=21
cifs.enabled=true
cifs.tcpipSMB.port=445
Flowable BPM engine configuration